May 20 2010
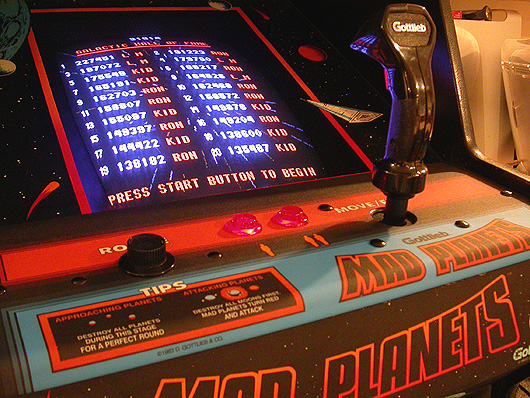
Not So Extreme Makeover “Mad Planets Edition”.
Tagged Under : Control Panel Overlay, CPO, Mad Planets, restoration, Restorations
When purchasing a game that only lived one year in an arcade then spends the next 25 years living comfortably in a home use only environment there isn’t much you need to do to “make it better”. However, being a perfectionist who usually enjoys doing full restorations there is always something you can do to “make it better” and my Mad Planets wasn’t any different. But this time things were a little different and there was no reason to take a game who survived 26 years and fully restore it.
First thing I did (besides giving it a quick cleaning) was to locate and install a few parts on the coin door that were removed by the operator back in 1984. Locating the parts was a fairly easy task thanks to Shane over at CoinOpSpace.com who graciously gave me the parts I needed.
After that was done the only thing left to do was restore the control panel. I’ve restored several control panels and this one was pretty much restored the same way I always restore them.
First I stripped away the old control panel overlay (CPO) by pealing off as much as I could. Then a used a water based stripper and let it sit overnight to finish getting off the adhesive that was left behind after removing the CPO. After all the adhesive was removed, I sand blasted, primmed then painted with satin black Krylon.
After letting the paint dry for about 48 hours I carefully applied a new CPO. The CPO was reproduced by Anthony at QuarterArcade.com. Anthony no longer has stock of the CPO’s but Brian Jones at GameStencils.com still has some in stock so grab one while you still can.
For the flight stick shaft I gave it a fresh coat of satin black. Not necessary, but it sure looks great!!! I located and purchaded a New Old Stock flight stick cover off of e-bay. Chris Moore from TokensOnly.com happened to have an extra New Old Stock trigger button that he was kind enough to send my way. For the flight stick insert Rich @ ThisOldGame.com was kind enough to rescreen the raised silver Gottlieb logo with a process called “Tip Screening” which really helped complete the restoration. The flight stick assembly went back together great!
Now time to reassemble.
I decided that my Mad Planets control panel really needed glowing red leaf buttons to match my Q*bert control panel so I ordered a Pac-Man lit Button Kit from Bob Roberts. Just note, if you install bob’s light kit that you need to swap out the bulbs for slotted 555 bulbs.
Well, there you have it… A near perfect Mad Planets that is even more perfect.


BONERS!
@BroH… Stay away from the games! 😉
I’m jealous. Looks awesome Bill!
BTW where’s the marquee light on Mad Planets?
@Brian – The Marquee is very very very dark and the florescent really doesn’t seem to kick out the colors unless the lights are real low. Thought about looking for a brighter light or installing two florescent lights in the marquee.
Bill,
Great job as always. You could have worked for Atari, Bally Midway, or Williams in their assembly department…LOL.
@Rick… Thanks!!! Working for Atrai, Bally, Midway or Williams would of been really fun. I want to be in the testing dept… Especially for “StarGate”… I could then say “Yup, I still stink at this game but it works”.
[…] I haven’t fully restored anything this year. I mean, I was able to detail Mouse Trap and Mad Planets but as far as a full fledge restoration it just hasn’t happened this year. Until today when I […]