January 04 2011
Preparing The Mess Hall For Our New Guest.
Tagged Under : Atari, Food Fight, restoration, Restorations
When I picked up Food Fight I knew my restoration options were somewhat limited due to lack of reproduction artwork. Luckily for me the overall condition of my game was pretty clean and Phoenix Arcade did reproduce the Control Panel Overlay (CPO) a couple of years back. So I’ll be sticking to the basics before I toss her into the game room. The basics involved cleaning the inside of the cabinet, wiping down the outside of the cabinet (Magic Erasers are indeed magic), repainting the marquee brackets and restoring the control panel.
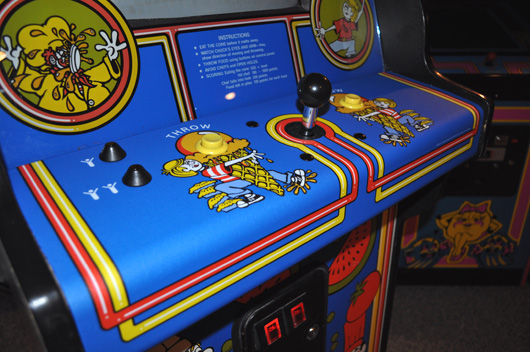
First thing I started with was restoring the control panel. Nothing different about this control panel from any other control panel restoration. Basically removed all the parts, stripped off the old CPO, sand blasted, primed and painted. From here I carefully applied the beautiful new CPO from Phoenix Arcade!!!
Repainted Control Panel.
New CPO from Phoenix Arcade.
CPO Being Installed.
New CPO Installed on Control Panel.
Next up was to rebuild the joystick. I was lucky enough to get a new joystick shaft and ball top with the machine. However, before I disassembled the stick I decided to order several NOS (New Old Stock) and reproduction parts are are known to wear out and/or break over time. These parts included a NOS Square Control Plate, NOS Upper Housing, NOS Lower Housing, a Reproduction Pivot Ball, Reproduction Dust Washer, Reproduction Linkages, two new 5K Potentiometers and some Nyogel 779ZC Damping Grease. With the exception of the NOS Centering Bellow which was kindly donated to me from another collector, most of these parts can be purchased VideoGameParts.com.
It was a pretty involved rebuild but with the schematic and paying attention when pulling it apart I had it rebuilt in around 30 minutes. If you look at the assembly photos below you can see that I decided to reuse many of the original parts. This was mainly due to my original white bellows not fitting into the Upper / Lower Housings. However, my original housings were in great shape so I decided to just reuse them at this time.
Joystick “Before” Rebuild.
Joystick Disassembled and Ready for Inspection.
New (Left) and Original (Right) Dust Washer and Pivot Ball.
New (Top) and Original (Bottom) Linkages.
New (Left) and Original (Right) Joystick Shaft and Ball Top.
Joystick Assembly.
Applying Plenty of Nyogel to the Pivot Ball to Prevent Premature Wear.
NOS Centering Bellow.
NOS Centering Bellow Installed into Bellows Cap.
Installing Upper Gimbal and Lower Gimbal into Mounting Plate.
Fully Rebuilt Joystick Assembly.
Fully Rebuilt Joystick Assembly.
Fully Rebuilt Joystick Assembly with Original Potentiometers and Linkages installed.
Control Panel Reassembled and Reinstalled on Cabinet.
Sand Blasted and Repainted Marquee Brackets.
I still have a few things I’d like to take care of such as restoring the coin door, installing the new Potentiometers and linkages. But as you can see see below Food Fight is more than ready to enter the game room. Time to start flinging some food!!!


Hopefully mine will look as good someday 🙂
Nice Job Bill,
A restored joystick is the most important thing to do on this particular game…I assume you calibrated the joystick once you replaced the old..this is in settings on game…a freshly rebuilt and properly calibrated joystick and your ready for some high scores…LOL!
@ Rich… I’m sure you’ll be screening new art before we know it… Probably already did a one off for yourself!!! haa haa.
@ Rick Ford… Yup, calibrated joystick! In fact, just installed the new Potentiometers and linkages the other day and re-calibrated and game play is even better!!!
Great rebuild article Bill! I will definitely be doing mine, with a big thanks to your step by step instructions and pics!